Well, internauts, your day is made. I’m here with the latest and most fabulous of updates on The Dodge.
We’ve been mostly… Driving the car. Actually using it – took the in-laws to dinner, for instance:
Driving the car means understanding it a bit more, to figure out what needs to be done, and what I want to do (as before, 2 different lists!) Before driving the car out to dinner, I had to figure out why the dash lights weren’t working. I think I mentioned before (as if anyone would have read that) that the fancy electro-luminescent lighting on the dash of this car is powered by a little power pack under the dash that takes the 12V DC that the car uses for… everything else, and converts it to about 250V AC, to power the lighting panels. Anyhow, those little boxes are notorious for getting old and ceasing to function. They can be rebuilt (looks pretty simple), or replaced with an updated replacement made by a specialist. I had previously ordered a replacement unit, and it arrived! Removed the old unit, installed the new one and… No joy. Still didn’t work. Sigh. Out comes the cluster.
Turns out, the cluster is pretty easy to remove from the dash in this car. Well, especially easy since all the screws were already removed – I discovered them rolling about in the bottom of the console storage compartment, so at least I didn’t have to chase down new ones!
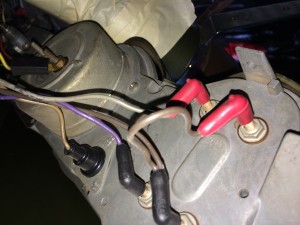
The cluster is interesting (to me, at least) in that each instrument is just wired individually – no flexible printed circuit board like most American cars seemed to use in that era. So, remove the screws, put a bit of tape on the steering column to protect it, and slide the cluster forward – reach under the dash to unscrew the speedometer cable, and then pull the cluster a bit farther forward, reach around and pop off all those little wires. Oh, take pictures like this one, so you know where the wires went!
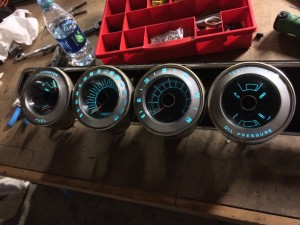
I took the cluster in to the workshop, and poked around. I also hooked up the old EL power supply to a bench supply of 12V, and tested it. 250V. Works fine. So I plugged that into the cluster and.. Nothing. Time to disassemble the cluster. There are wires running inside the cluster to each gauge face (6 of them) and each gauge needle (6, again!). I disconnected each one, and went one at a time, adding them back. Speedometer first – Light! Tach, Light! and so on, until the needles for the Temp and Oil gauges. Killed the whole thing. Shorted, somewhere. Since those are the 2 gauges that don’t work, I left them disconnected, reassembled the cluster, and…
Yes, lights! Dazzling. Really, it *is* a pretty cool dash. Very retro-futuristic, and one of the things that made me want one of these cars – now I just have to find a functioning Oil and Temp gauge, and of course restore the thing cosmetically. But it works. Reinstalled it into the car, and… Stopped working. Disconnected the radio and console leads (they’re both also EL lit) and it still didn’t work. Removed the new, fancy power supply unit and put back the 47 year old one and… It works. I don’t know if that power supply was defective originally, or got killed by the same short that didn’t really bother the original unit. I have since bench tested the replacement module, and it’s giving 190V with no load, but again, I don’t know if that’s how it was, or how it is, dig? Dig.
So, with dash lights in place, we were able to take the car to dinner that evening. Rolled up, and naturally the valets just move a few cones, and wave us into the spot in front of the door. 2 factors here – 1) It’s always a good idea to drive a cool old car to a nice restaurant. Everybody likes it. The owner of this particular restaurant drives a certain 1968 Camaro you may have seen somewhere nearby, for instance. This leads to the 2nd factor – it’s good to be friendly with the natives! They keep an eye out for you.
Well, driving the car about uncovered the leaking heater core (of course), which I ordered a replacement for, Saturday delivery. Arrived damaged. Of course. Ordered a replacement replacement, and it’s only a little dinged up from the shipping (why do they just put these things in ill-fitting boxes?!), but it’s also a not-very-nice looking aluminum thing, rather than brass. Oh, well, I’ll install it. Only temporary until the AC unit goes in next spring.
The other thing we noted in riding in the car was the ill-fitting windows. Part of that is the sagging drivers door. Or, rather the mis-aligned door. See, I thought it was a typical sagging hinge, but if you mostly shut the door, and lift UP on it, it really doesn’t wobble like a typical worn hinge. It’s actually pretty stable. I noted some shims between the lower hinge and the door (easier than removing the front fender to access the bolts and slide the hinge, I suppose. I noted them, observed them, pondered them, then added another shim to each bolt hole, bringing the door up enough to where it actually lines up and shuts pretty well. Improvement! Then I popped off the door panel on that door, and adjusted the glass a bit. The rear glass needs the upper stop adjusted (it goes up too far) but that side is now pretty tight. I need to order a full weatherstripping kit. Someone remind me about that.
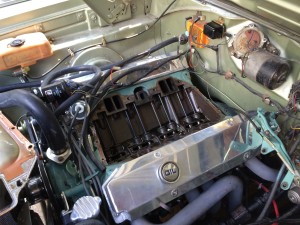
I lack (somehow) a picture of it, but this car came with a 600 CFM edelbrock carburetor on it. Now, aside from the fact that 600 CFM is a little undersized for a 440, I also have a completely irrational hatred of Edelbrock carbs. Irrational, because I have no evidence that they are anything but fine, functional, possibly fabulous bits of kit. I just know and like Holleys. Hence, the dog, Holley: (DOGPICTURE)
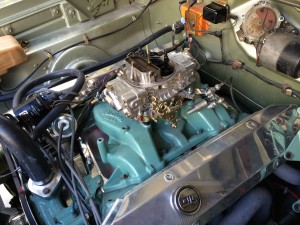
Luckily, there was a spare 770 Holley available from a previous project. So, off with the Edelbrock, on with the Holley! 20 minute job, and we’re off to the races. Or, not, of course. I ordered a Lokar throttle cable and kickdown cable set as well, and got those installed. Dropped the carb on. And… no fit. The intake has a weird bump where the fast idle screw on the Holley is. Sigh. Off to Barnett Performance (THE SOUTH’S Racing Equipment HEADQUARTERS!) to pick up a 1/2″ spacer. I like to run a 4 hole spacer anyhow, so this wasn’t the end of the world. Now, part of the install was also removing the giant factory brackets for the throttle cable and transmission throttle levers. Big steel rods and levers, held on to the engine by the intake manifold bolts. Loosened the bolts and heard a disconcerting <thwok> noise.
Sigh. I know that noise from my years running a 351C Ford motor. It’s the steel valley pan gasket slipping. Yup, couldn’t get the bolts back in past it on that corner. Loosen all the bolts (only 8 on a MOPAR big block, interesting!) and still no joy. Back to BARNETT PERFORMANCE for a new gasket. While I was there, my salesguy helpfully signed me up for their RACER PROGRAM thing, and now I get a pretty decent discount on parts. Which is cool. Be awesome if they carried Hotchkis, but they do carry sell Wilwood, which could be handy.
Anyhow, cleaned the head and manifold mating surfaces, decided which of the gaskets to use (pan only, pan and paper gasket sandwich, or some partial combo). I went with pan, and paper between pan and aluminum intake. Whatever. On, and it works. Oh, I added a fuel filter, too. There wasn’t one. When I dumped the fuel out of the old carb, out came all kinds of junk – the type of junk you might want in a filter, instead.
So, the next little annoyance is a preponderance of header exhaust leaks. They guy I bought the car from had the headers installed, and I don’t think he drove the car much. I really doubt he ever snugged up those header bolts. So, I got the motor hot, and went around with a wrench to tighten the bolts up. Well, a couple of wrenches, since there is a combination of studs and bolts holding them on. Got them all snugged down, and only one felt a little… odd. And that’s the corner where, after my work, there was still a leak. Sigh. Back to that bolt Yeah, it’s weird… It’s… Stripped out. I pulled the bolt, and someone had put in a 2 1/2″ bolt, completely slathered in sealer. See, that bolt hole goes into the water jacket on the head – I figure the header installer was smart enough to know that, loaded up the bolt with sealer, essentially glued it in place, and sent the car on its way. Greaaaatt…..
The only saving grace is that this was the *only* mildly accessible hole on the heads.
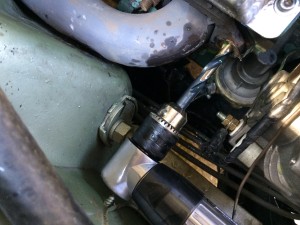
Passenger side, front. So, I spent just about an hour running around gathering supplies, and just about 20 minutes actually fixing the problem correctly. Drilled out the hole with a right angle drill and a barely short enough 25/64 bit, tapped the hole, inserted a 3/8″ heli-coil, and reinstalled a bolt with sealer on it. Bippity-BAM! Loosen the rear bolt on that header tube, tighten the front and rear in equal steps (to avoid distorting the flange), and we’re leak free on that cylinder. Huzzah!
See that header tube? The one that’s been “clearanced” to fit around the shock tower? Yeah, I’m not sure what headers these are, but they are VERY close to the shock tower on the passenger side, and hitting the steering box on the passenger side. I need to take some measurements, but I’m hoping that the issue is bad motor mounts, or perhaps even the incorrect parts, holding the motor too low in the engine compartment. I’ll look into that.
Well, Charger-fans, see you next time, on ChargerChat!


