

Much like Maverick in Top Gun, I’m a loose cannon. A wild man with lightning reflexes and the ability to play volleyball. But I carry a heavy weight and a chip on my shoulder.
What? None of that is true. However that’s a picture of the dogs, bein’ feisty. As feisty as I’m feeling, with all the progress I’ve made on the ol’ charger recently. Let us catch up, you and I, on the happenings in Chargerville.
 When last we spoke, I had done some work on the instrument cluster, and determined that a couple of the gauges
  were inoperative. So, I picked up a couple units off ebay, and those are for parts. Now for the tedius task of completely disassembling the gauges, refurbishing them, and reassembly. I’m about 1/4 done on that project, but they’ll be nice when I’m done. I hope. The new overlays are pretty nice, but a little tricky to put on, especially the larger ones for the tach and speedometer.
We went away for a few days around New Years Eve (Happy New Year!), and whilst we were away I got a phone call from our very nice neighbor asking if I would like her to move 8 large boxes off our front stoop to perhaps… Anywhere that wasn’t so visible. Now, I knew what was in those boxes, and told her I could get someone to come by and lug them, but she said it wouldn’t be a problem, and transported them to the side porch for me. Thanks, Robin!

Oh, boy! Suspension parts! This is as good a time as any to give a solid shout out to the good people at Reilly MotorSports. Now, I was expecting a good experience, based on Bill’s Duster build, but I have to say that out of all the vendors I’ve dealt with on this project, for parts large, small, expensive and cheap, the RMS folks are professionals. They answer the phone, they’re knowledgeable (and free with that knowledge,) and they deliver what they promise, when they promise it. I placed my order over the phone, (with no deposit requested!) they gave me a delivery time a couple weeks in the future, and lo and behold, there they were, minus only a couple of small fittings for the power steering rack. They had warned that those 2 fittings were delayed, and they showed up only a few days later. Now, this little story may seem like not at all a big deal in today’s world of Internet this and overnight everything from Amazon that, but in the world of parts for Hot Rods and muscle cars, this is a Very Big Deal. Somehow, RMS is managing to produce a very specialized set of parts, and do so in a way that they can manage effectively and professionally. Well done, folks!
Meanwhile, just look at this stuff. How cool is this?!


 I couldn’t not mess with all those snazzy parts, so I went ahead and assembled the shocks. Neato mosquito. They’re Viking double adjustable jobs, for extra confusion and fiddling! Sweeeet. I also inventoried all the parts (all present) and reviewed the instruction sheets. Easy-breezy.

Just for fun, I also laid out the wiring harness for the new FAST EZ EFI 2.0 system, and played with it. This was an interesting and fruitful experiment, as it turns out. I was getting some odd errors (like this one) from the system, and it wasn’t saving the parameters being set by the little Wizard you run for initial configuration. I eventually figured out that when the system does certain things (like saving data, apparently,) the power requirement jumps – past what I was giving it from the regulated DC bench supply I was using. Up the available current, and the errors magically disappeared. Interesting.
 I also took the time to make my own pigtail for the fuel pump wiring. I’m going to run my fuel system with the PWM output from the ECU, rather than as a mechanically regulated full return system. This should keep the fuel pump cooler by lowering the duty cycle (it only runs as fast as it must to provide the flow and pressure required, rather than flat out all the time). Now, that means the output from the ECU needs to feed an SSR (Solid State Relay, essentially a large power transistor in a special case), that switches the power on and off very fast to the pump. That’s the SSR in the upper right, there. The small ring terminal is a temporary power feed for the fuel pump, for testing. It passed. Works like a charm. The lower plug is the weatherpack connector to the ECU harness, and there’s a fuse holder, as well. What an achievement!

Got my headliner back from John @ The Mad Stitcher, over in Chamblee, and I reinstalled it. Mucho better. He ended up having to essentially strip the entire board, put down new foam, sculpt in the detail lines as they were, then recover it with the OEM material. Looks terrific, ‘eh? Yes, yes it does.

Speaking of small things, there is a small red lens on the lower left of the dash of these cars. Didn’t do anything on my car, so when I was under there the other day measuring for the AC system vents, I felt around to see if it was connected to anything. Nope. Felt around some more, and found a pigtail with a broken lamp in it. Got the lamp base out with pliers, put in a new bulb and… Presto! A parking brake warning lamp! Works like a charm. For some reason, I found this extremely satisfying.

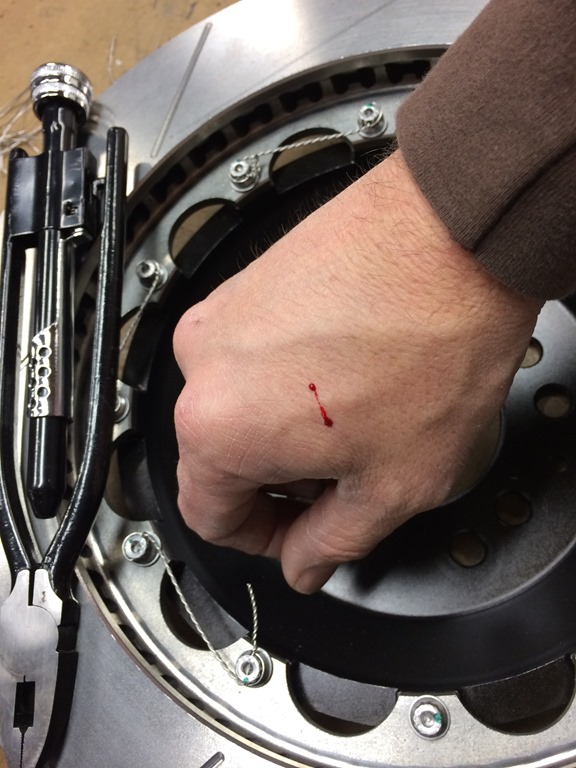
As part of the “keep busy with sub-assemblies while it’s really cold out” phase of this project, I also assembled the brake rotors to their respective hats. Each bolt gets loctite, and torqued to a specific figure that I do not presently recall, nor does it matter to you, I suspect, so let’s call it 23.7 bunkletrons. 
Then we move on to the fun part, the safety wire. Each bolt head has holes drilled in it, so that the wire can pass through, in a specific pattern that keeps the bolts from being able to back out. The wire is also quite sharp when cut, and flails around while you’re doing the work. But it’s fun, and pretty satisfying, to boot. 
 The last thing I’ll leave you with today is a picture of this fuel filter. Now, why is this at all interesting? It’s not. That’s what makes it interesting, and good. It’s the GF652, a fuel filter used on jillions of GM fuel injected cars. This means you can get them at any auto parts store, anywhere. For a custom build like this, it’s tempting to use a fancy “high performance” filter setup, with an anodized aluminum case and AN fittings, but this little puppy is where it’s at.
Get the appropriate fittings (Male adapters, 16mm x 1.5 to –6AN, I use steel, rather than aluminum), and it mates up to the high pressure fuel system easily. Poof. And if it gets clogged up somewhere on a road trip, a replacement is cheap, and available. There’s your Free Tip Of The Day!
Well, friends, fans and frauds, that’s enough for today. I don’t want to overwhelm you with too much thrilling action. Next time, I’ll regale you with scary ghost stories, and tales of transmissions, differentials, and probably something even less thrilling.